Creating a MemTest86 bootable USB Flash drive in Linux/Mac
- Download the current Memtest86 package as a Zip file from this page.
- Unzip the file. Inside the Zip there is a "disk image" file. For the free edition of MemTest86, this file is called, memtest86-usb.img
-
Insert a USB flash drive into a USB slot. It needs to be at least 1GB in size.
**WARNING** The contents will be overwritten in the next steps. -
Determine which device the USB drive is assigned as by opening the Terminal and typing the following command. Double-check to make sure you have the correct drive.
On Linux:
lsblk -p -o NAME,VENDOR,MODEL,SIZE,TYPE,SERIALNAME VENDOR MODEL SIZE TYPE SERIAL /dev/sda VMware, VMware_Virtual_S 80G disk ├─/dev/sda1 512M part ├─/dev/sda2 1K part └─/dev/sda5 79.5G part /dev/sdb Lexar JumpDrive 15G disk AASNGKKA04EW2GXD ├─/dev/sdb1 255M part ├─/dev/sdb2 256M part └─/dev/sdb3 512M part /dev/sr0 NECVMWar VMware_Virtual_SATA_CDRW_Drive 1024M rom 01000000000000000001
On Mac:
diskutil list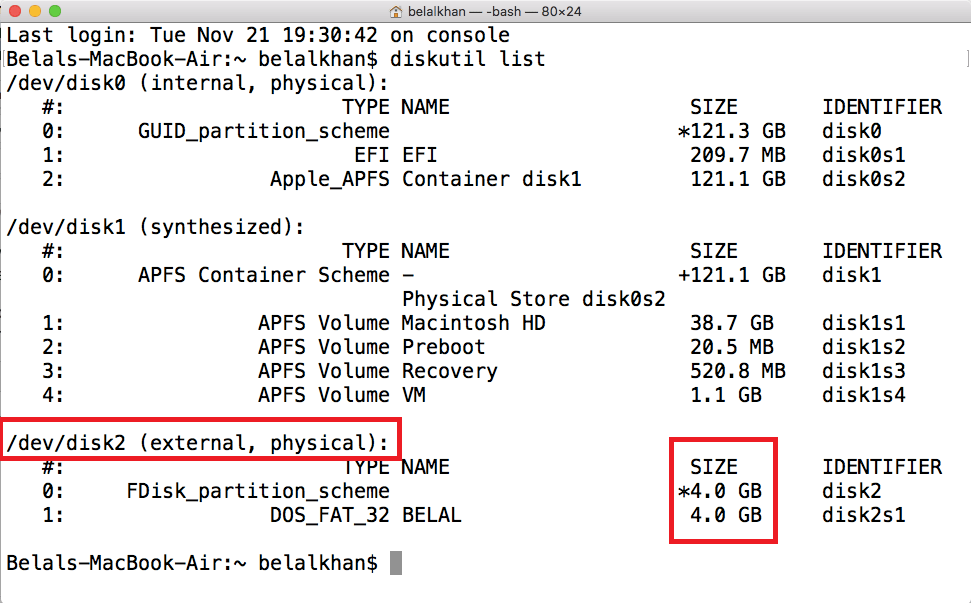
-
Unmount all volumes on the USB drive by typing the following command:
On Linux:
sudo umount <device_name>?*
In the example above the device name is /dev/sdbOn Mac:
diskutil unmountDisk <device_name>
In the example above the device name is /dev/disk2 -
As the root user, use the 'dd' command to write the image to the USB drive. For example,
On Linux/Mac:
sudo dd if=<input_file> of=<device_name>where:
<device_name> is the device the USB key is assigned to. Use the base device (ie. /dev/disk2) not a partition designation (ie. /dev/disk2s1).
<input_file> is the file path for the input image file. (E.g: ~/Downloads/memtest86-usb.img)**WARNING** All data on the USB key will be lost
**FINAL WARNING** Make sure that the device used in the dd command above is correct. The consequence of picking the wrong drive are potentially disastrous, such as total and complete data loss from your hard drive.
Booting MemTest86 USB on Mac
Note: MemTest86 does not support booting on Apple Silicon (M1/M2/M3) based Macs.
When booting, you need to hold down the ALT / Option key on the Mac keyboard while powering on the machine to boot from USB.
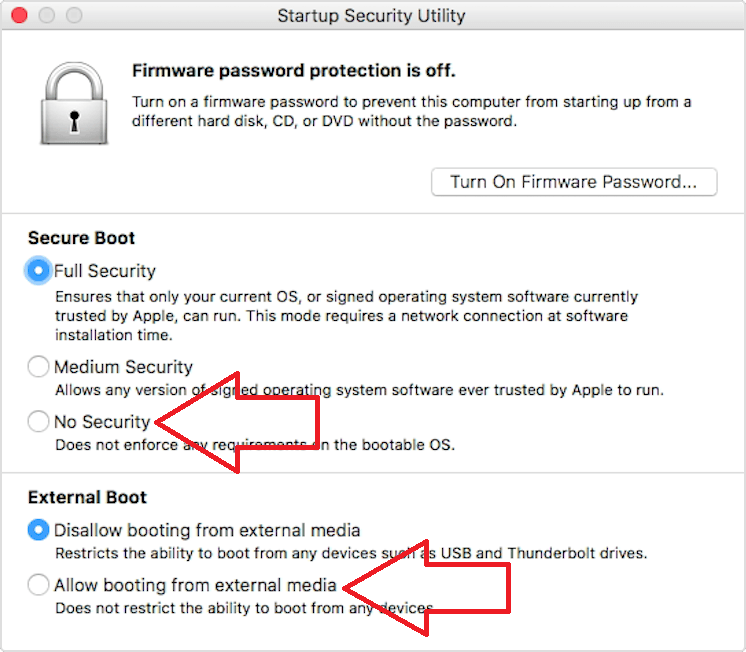
On newer Macs from 2019(*) with the Apple T2 Security Chip, you may need to change the SecureBoot settings for MemTest86 to boot. Please see the following page for instructions: https://support.apple.com/en-us/HT208330
(*) These Mac computers have the Apple T2 Security Chip:
- iMac introduced in 2020
- iMac Pro
- Mac Pro introduced in 2019
- Mac Mini introduced in 2018
- MacBook Air introduced in 2018 or later
- MacBook Pro introduced in 2018 or later
Allow booting from external drives and allow booting from non-apple software: